
Need a printable version of this article? Download the Article (PDF Version).
Add-in Install Guide
To install any CLW add-in for a user, that user will need Windows Administrator Rights on their Windows user account.
- If the user DOES NOT have administrator rights, go to Step 5.
- If the user DOES have administrator rights, go to Step 6.
- If you don't know if the user has administrator rights, go to Step 1.
Step 1.
- On the user's device, press the Windows key or select the Windows icon from the Taskbar.

Step 2.
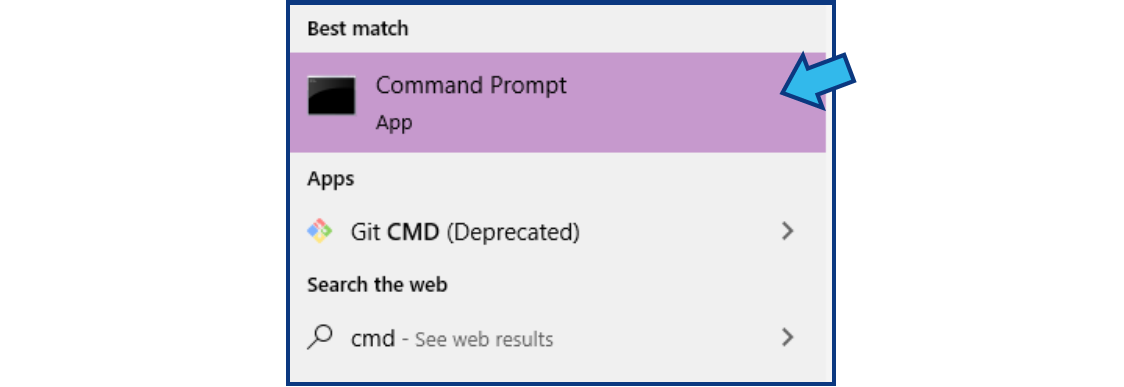
- Type cmd. The Command Prompt app should appear under Best match. If highlighted, press the Enter key, or use the mouse to select it from the list. (Note: There may be no visible place to type at first, but it will appear when you begin typing with the window menu open).
cmd
If you already know the user's net user account name, go to Step 4.
Step 3.
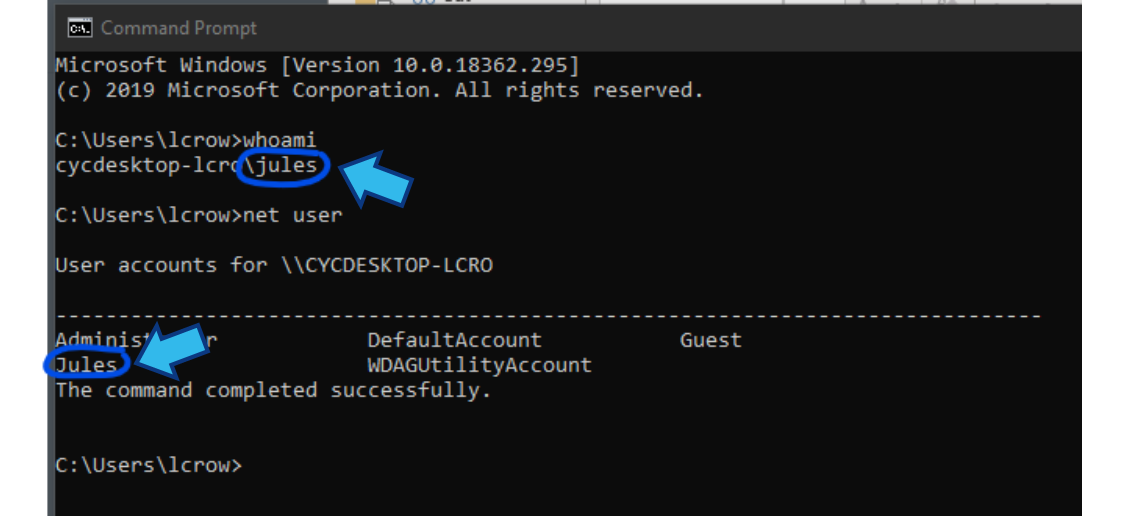
- At the prompt type whoami and press the Enter key to display the user's net user account name.
whoami

- If there are multiple users on the device you can also type net user to see a list of all available user accounts.
net user

- In the example pictured below, the net user account names when using these options are circled.
Step 4.
- At the prompt, type net user USER_NAME and press the Enter key. (Replace USER_NAME with the user's net user account name from Step 3.)
net user USER_NAME

- If the user has administrator rights, *Administrators will be listed in Local Group Memberships.
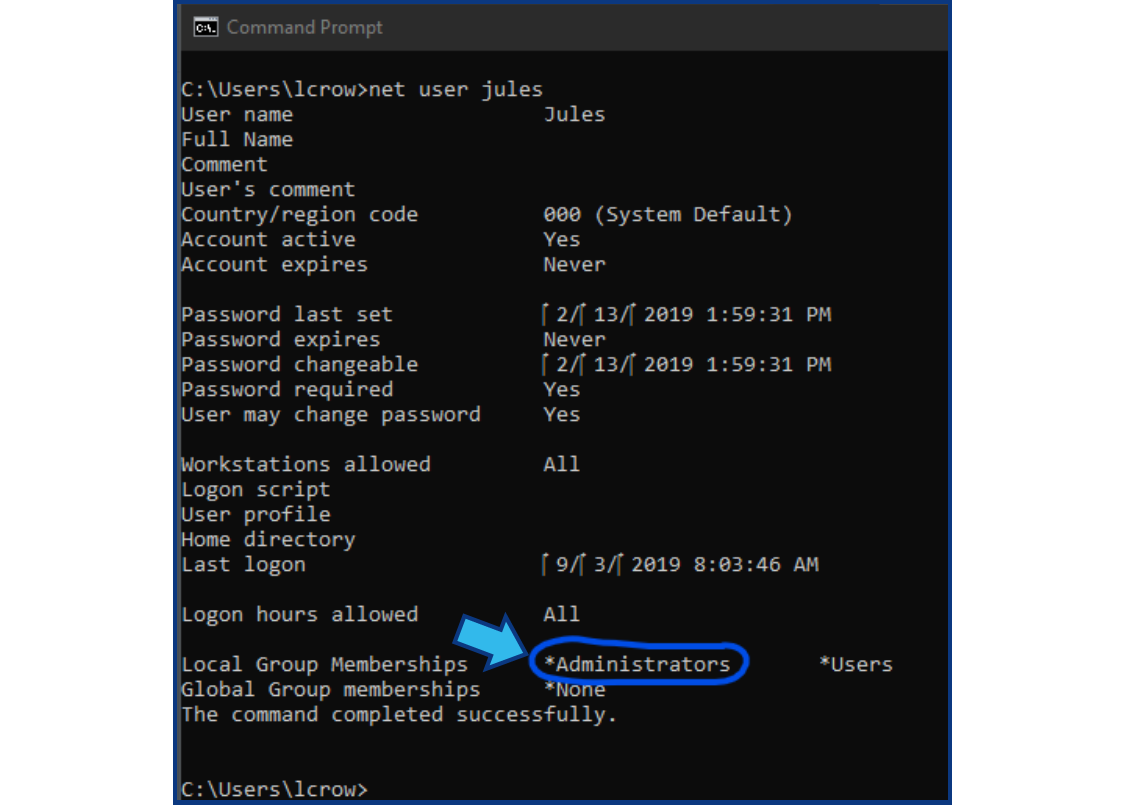
If you do not see *Administrators in the list, you will need to grant the user Administrator rights to perform the installation. These rights can be revoked once the installation is complete.
Step 5.
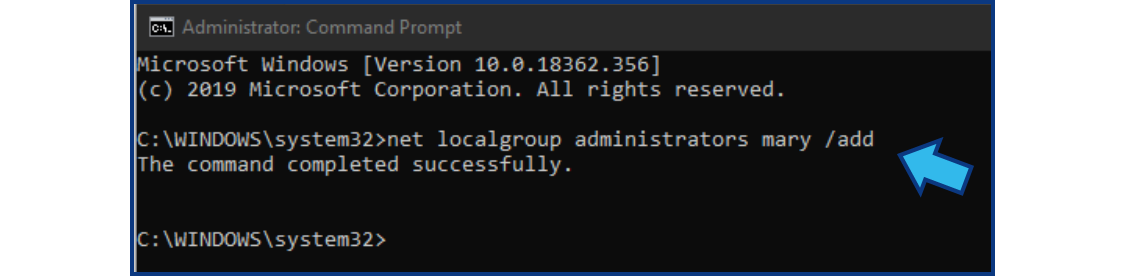
- Open Command Prompt as Administrator by pressing the Window key, typing cmd, and pressing Ctrl + Shift + Enter. When prompted to allow the app to make changes to your system, select Yes. You should see Administrator: Command Prompt in the title of the app that opens.

- At the prompt, type net localgroup administrators USER_NAME /add and press Enter. (Replace USER_NAME with the user's net user account name. If you don't know the user's net user account name, go to Step 1..)
net localgroup administrators USER_NAME /add
Step 6.
- To begin installing an add-in, first close all instances of Word, Excel, Outlook, and CLW on your device.
Step 7.
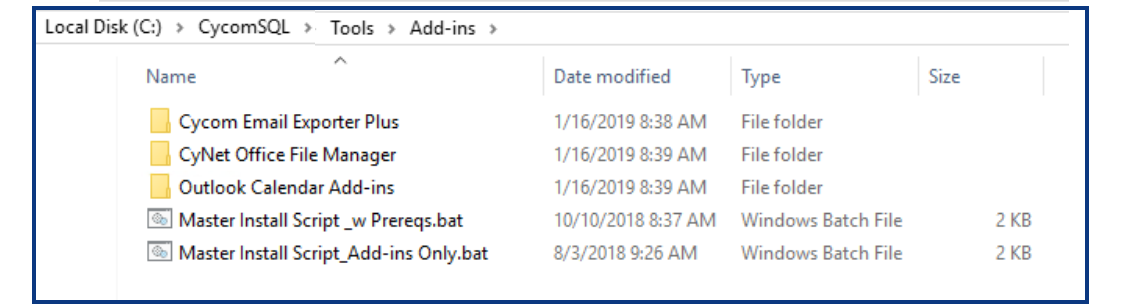
- Locate the add-in you wish to install. The location of the add-ins varies but is typically located in C:\CycomSQL\Tools\Add-ins or on a network shared drive. The add-in is usually located in a folder named for the add-in.
- The Office File Manager add-in is usually in a folder labeled CyNetOfficeFileMgr.
- The Email Exporter add-in is usually in a folder labeled Cycom Email Exporter Plus.
- The Outlook Calendar add-in is usually in a folder labeled Outlook Calendar Add-ins.
- If you can't find the add-in you are looking for, contact Cycom Support.
Step 8.
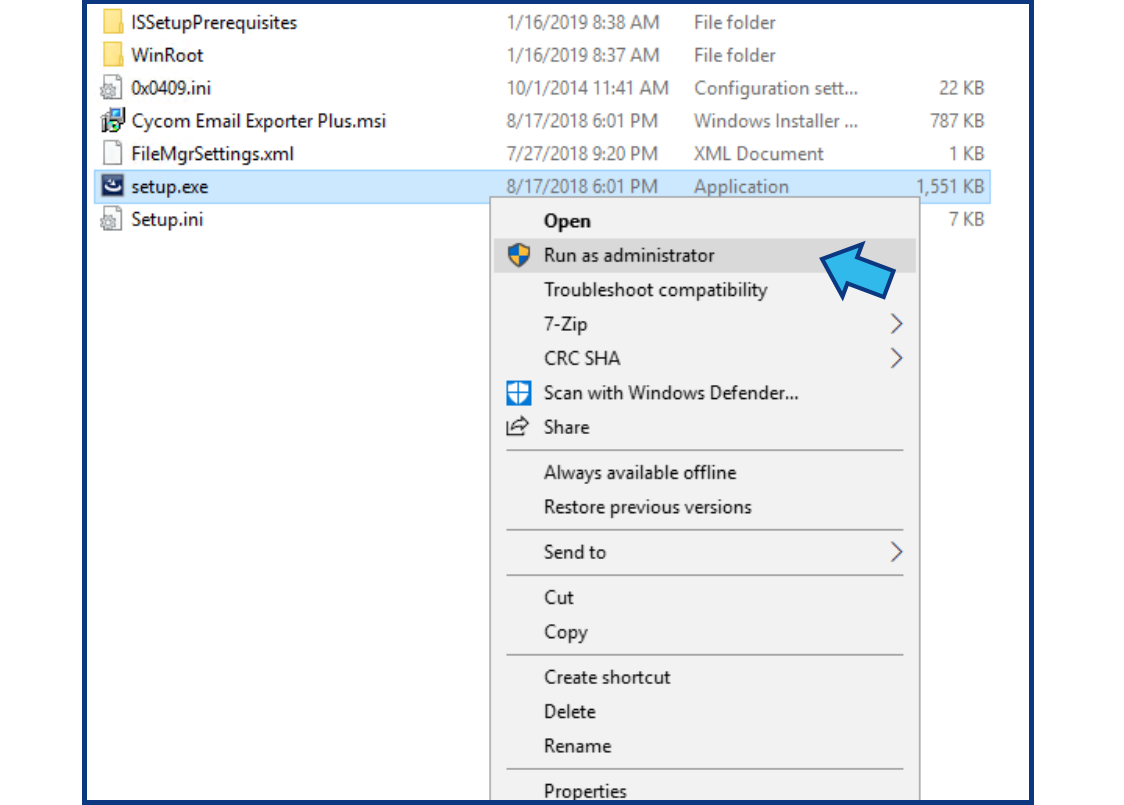
- Open the add-in folder, right-click the setup.exe application, and select Run as administrator.
Please note you need to right-click and select Run as administrator even if the user has admin rights on the device.
- In the example pictured below, we have opened the Cycom Email Exporter Plus folder. The files you see may differ, but there should always be a setup.exe application.
- If there are no prerequisites needed, you will see the InstallShield Wizard. Follow the prompts to install the add-in.

- If the installer detects you need prerequisites, it will appear in a wizard similar to the one shown above. Install the prerequisites suggested. (Note: You may have to restart the device after some prerequisite installations. Be sure to save any vital work prior to restarting.)
If you have to restart, you will need to repeat Step 8 from the beginning.
- If you are prompted to enter an IP address, enter the following information:
- IP Addres: 0.0.0.0
- Service: Leave blank
- Port: 6655
- Secure http: Uncheck
- Install for All Users: Check
- Use Upload Service: Uncheck

Step 9.
- Install all needed add-ins (repeat Step 7 and Step 8 for each add-in).
Step 10.
- Once installation of all add-ins is complete, check that the add-ins are showing as installed in the user's programs list. Press the Window key and type add. Select Add or remove programs.
add

- Find the add-in in the list. If an expected add-in is missing from the programs list, try the installation again, starting at Step 7. If the add-in fails to appear in the programs list, please contact Cycom Support.
Step 11.
- Check that the add-ins have been configured correctly.
- For Cycom Email Exporter Plus:
- Open Outlook
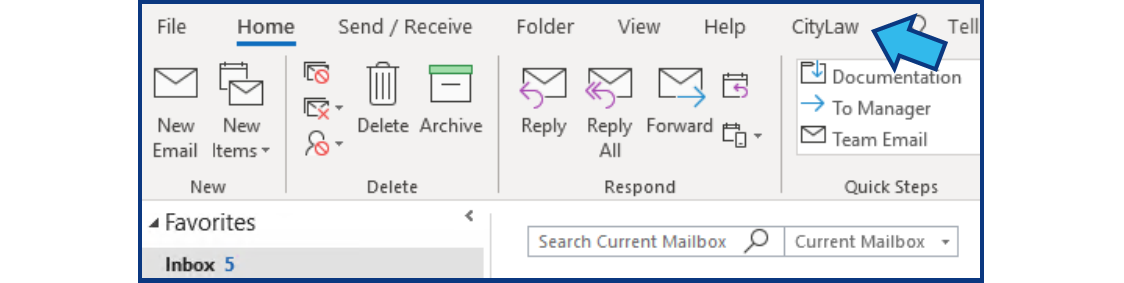
- Confirm that CLW has been added to the tabs at the top.
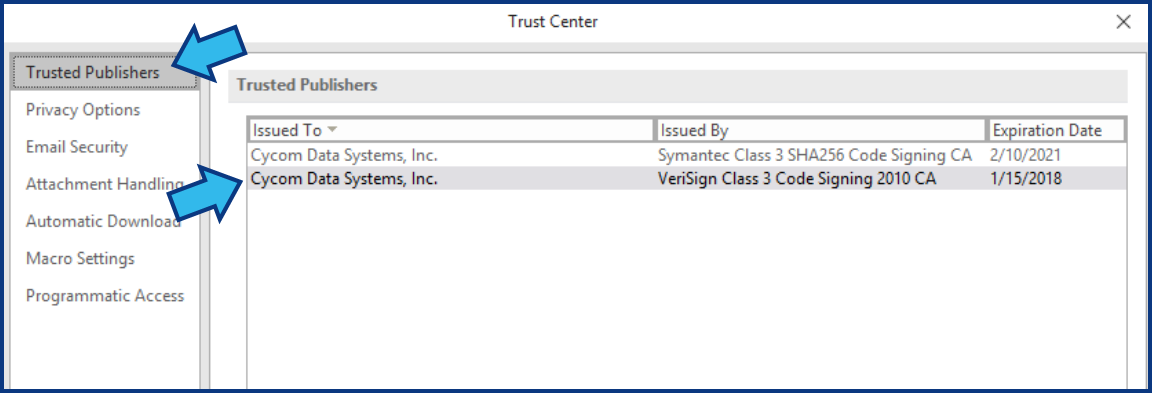
- Confirm Cycom is a Trusted Publisher. Select the File tab. Select Options. Select Trust Center. Press Trust Center Settings... and in the Trust Center window select Trusted Publishers. You should see Cycom listed.
- For CyNetOfficeFileMgr:
- Open Word
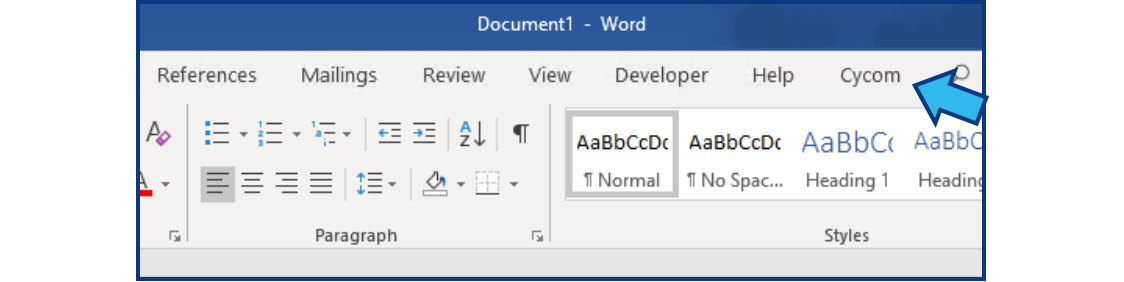
- Confirm that Cycom has been added to the tabs at the top.
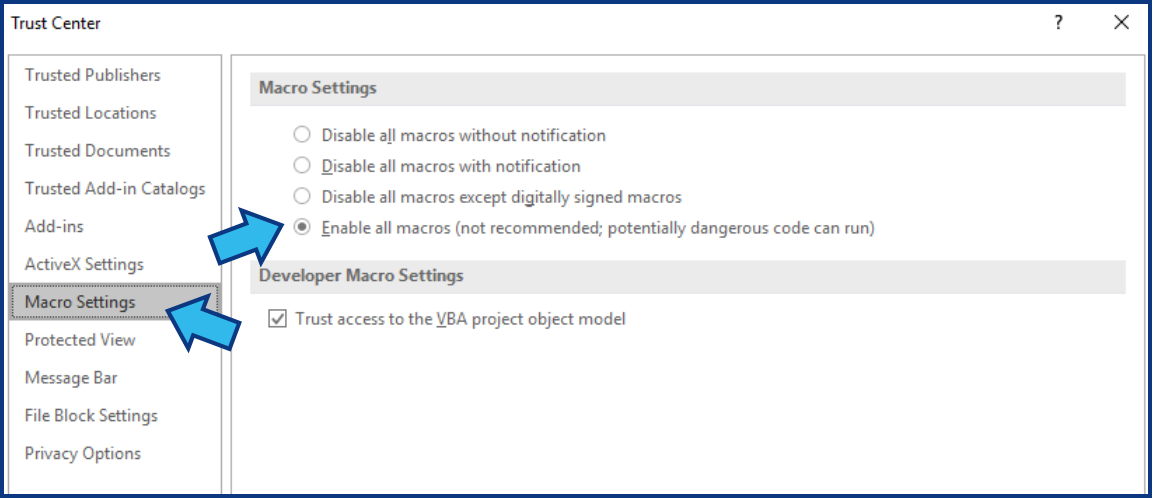
- Confirm macros are enabled. Select the File tab. Select Options. Select Trust Center. Press Trust Center Settings... and in the Trust Center window select Macro Settings. Confirm Enable all macros is selected.
- Confirm Cycom is a Trusted Publisher. Select the File tab. Select Options. Select Trust Center. Press Trust Center Settings... and in the Trust Center window select Trusted Publishers. You should see Cycom listed.

- If Excel is used by the user, repeat these steps for Excel
- For Outlook Calendar Add-ins:
- Open Outlook Calendar
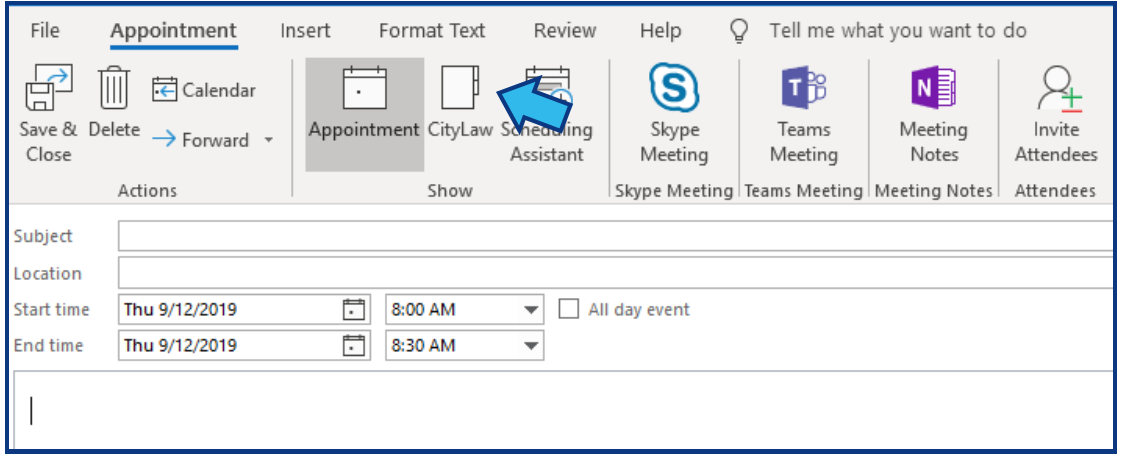
- Confirm there is a CLW button available when creating a new appointment.
Step 12.
- Check that the add-ins function as expected. Open CLW.
- For Cycom Email Exporter Plus:
- Confirm you are able to Save an Email from Outlook to CLW.
- For CyNetOfficeFileMgr:
- Open a matter in CLW and select the Attachments icon from the Module Toolbar.
- Create a New document from the template folder and confirm it saves to CLW.
- Confirm you are able to preview and open DOC and PDF documents and emails from within CLW.
- For Outlook Calendar Add-ins:
- Open Outlook Calendar
- Confirm you are able to enter an appointment in Outlook and it saves in CLW.
- Confirm the appointment shows correctly in CLW and is associated with the correct user and matter.
If you encounter any errors in the installation process, please contact Cycom Support.
Comments
0 comments
Please sign in to leave a comment.