
Need a printable version of this article? Download the Article (PDF Version).
These notes are provided by Cycom Data Systems, Inc. to support the use of CityLaw / CountyLaw Web (CLW) and are intended to be used for review of general topics covered during training.
If you discover an error in this document, or if you encounter any problems performing any steps described, please contact Cycom Support at support@cycominc.com or by calling 888-292-6688.
Contents:
- Zooming and Resizing
- General Layout
- Customizing the Dashboard
- Table Sorting and Filters
- Entering Data
- General Module Layout
- Creating New Matters
- Module Tabs
- Module Toolbar
- Module Action Bar
- Searching for Matters
- Importing Files and Folders
- Importing Using CyImportFile Tool
- Importing Using Send To Option
- Importing Using Outlook Add-In
- Creating New Documents from Templates
Web Version Introduction
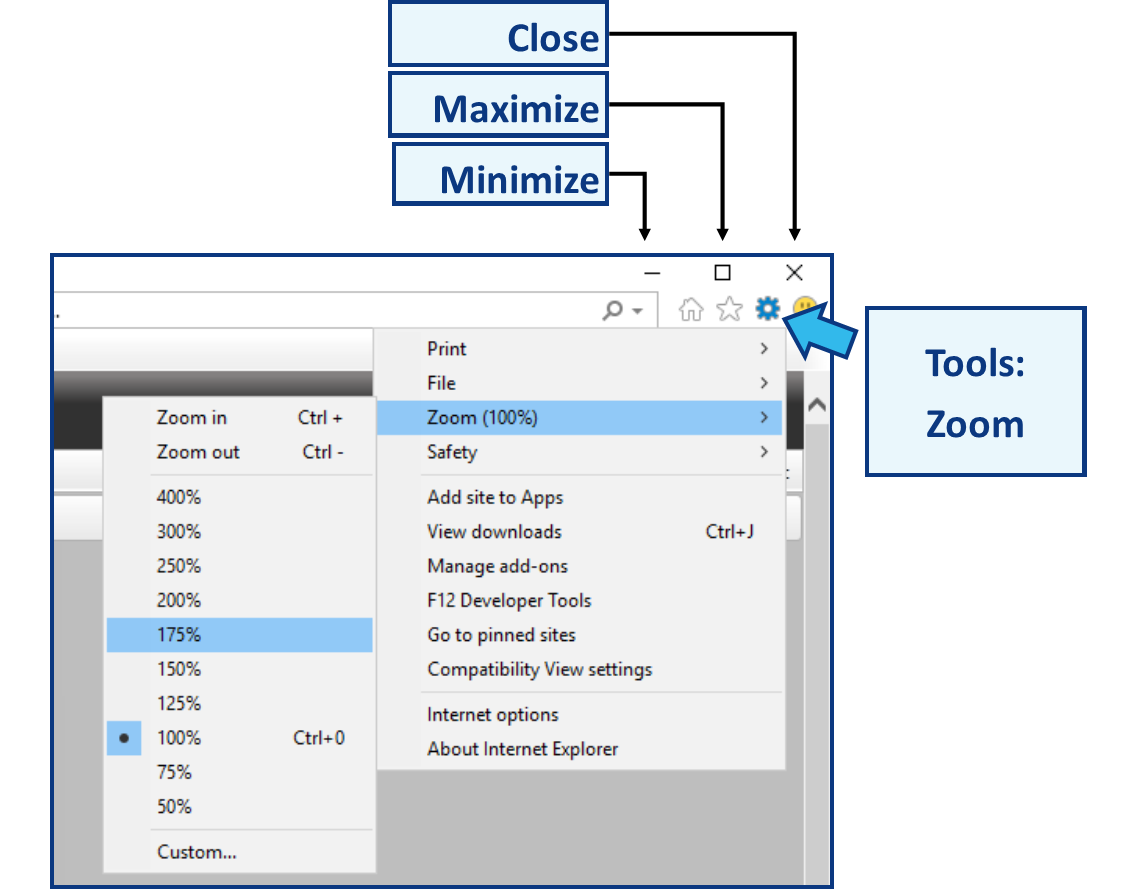
Zoom and Resize
Everything in CLW happens in one Internet Explorer (IE) browser window tab. Use the tools you already know to minimize, maximize, close, resize, zoom in, and zoom out of web pages.
General Layout
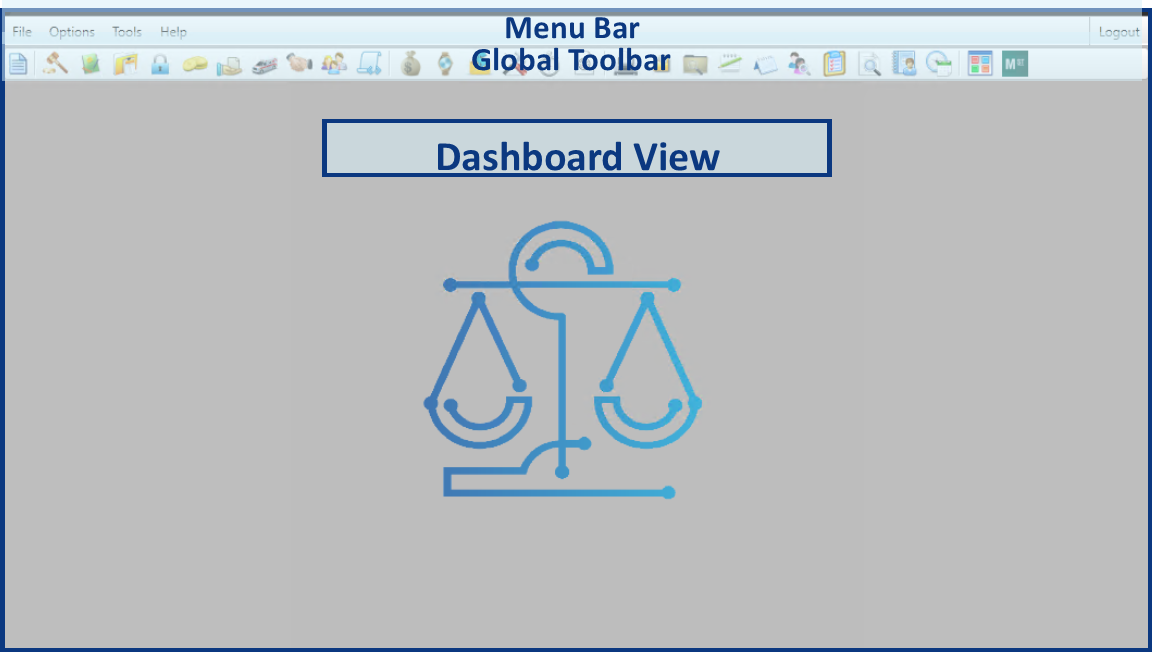
CLW is comprised of three main sections which are visible unless you are viewing a report. They are the Menu Bar, the Global Toolbar, and the Dashboard View. All global actions are accessible in the Menu Bar and/or on the Global Toolbar. The Dashboard View will change depending on default settings and selections chosen.
For more information about the general layout, check out the following article: General Layout of CityLaw / CountyLaw
Customizing the Dashboard
The Dashboard default view can be changed and customized. By default, Skyline View is set as the default view.
Set the Dashboard default view by doing the following:
- Select Tools in the Menu Bar and select My Preferences.
- In the My Preferences window, select Initial View.
- Select a default view and press OK.
For more detailed instructions of this process, check out the following article: Set Default View
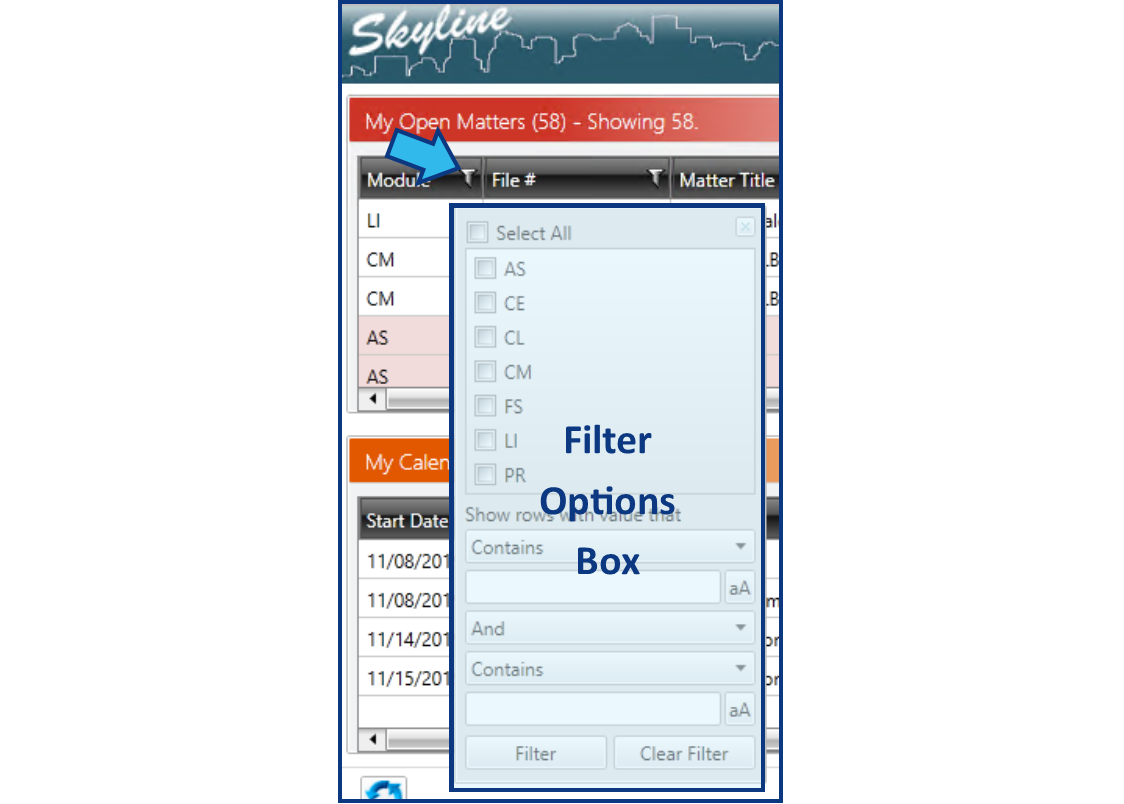
Table Sorting and Filters
All tables, or grid boxes, in CLW offer the ability to sort and/or filter contents to help you find what you need quickly. Left-clicking a table column heading will sort the list first in ascending order, then descending order, and finally, in default order for that table column.
Filters, where available, allow additional sorting options. Set table filter options for a column by doing the following:
- Press the Filter icon on the column heading.
- In the Filter Options box that appears, select or enter your filter options.
- Press Filter.
Modules and Matters
Entering Data
In addition to standard data entry fields such as text, drop-downs, and dates, CLW has some drop-down fields that allow multiple selections, denoted with a button to the right of the drop-down arrow labelled with “++”. CLW also has search selection fields that allow you to search for the option from a list, denoted with a button to the right of the entry field labelled with “…”.
Some fields are freely editable. Others, such as Notes, may require being selected first and then pressing an Edit button. A few fields, such as File Number, are only editable by users with specific security profiles and/or passwords.
For more detailed information about data entry, check out the following article: Navigation and Data Entry Tips
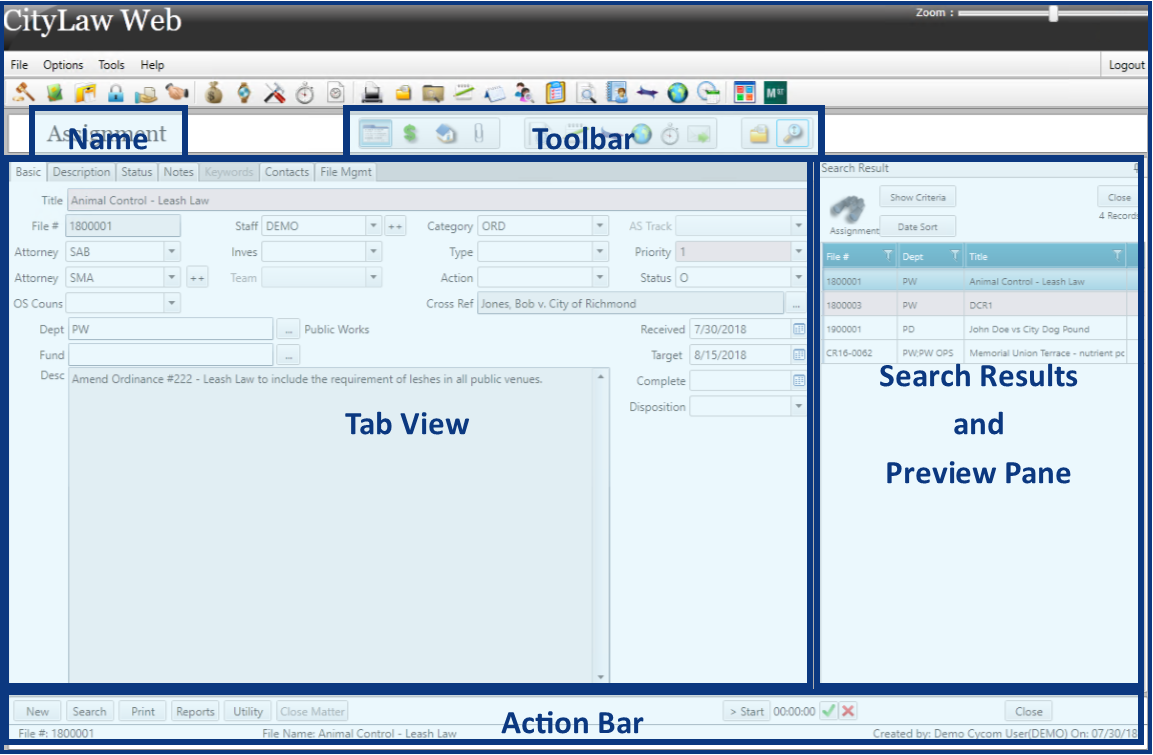
General Module Layout
Standard modules in CLW follow the same layout. They include the following sections: Module Name, Module Toolbar, Tab View, Search Results and Preview Pane, and Module Action Bar.
For detailed information about the general layout of the standard modules, such as Litigation, Assignments, Claims, etc., check out the following article: General Layout of Modules
Creating New Matters
New matters are created by first selecting the correct module and then pressing New in the Module Action Bar. Each module may have subtle differences, but the process is mostly the same. A prompt for allowing Auto-Numbering or entering a File Number manually appears. Then basic matter data fields are entered.
For detailed information on creating new matters, check out the following articles:
Module Tabs
Selecting some items in the Module Toolbar changes the tabs available in the Tab View. Every module, except for Time Accounting, Billing and Accounts Receivable, and System Management, has a Basic Matter Data tab view. The Basic Matter Data tab view is also the default view when a matter is first created or whenever the matter is opened from outside the module.
For a description of some of the Assignment module Basic Matter Data tabs, check out the following article: Assignment matter screens
Module Toolbar
The Module Toolbar has icons for the various module Tab Views, including Basic Matter Data and Attachments. It also has icons for displaying the matter calendar, your open matters, and the search criteria.
Module Action Bar
Action buttons for each standard module can be found at the bottom on the Action Bar. This is where you will find the New button to create new matters. It is also where you will find the Print and Report buttons to display customized and built-in reports.
Searching for Matters
There are several ways to search for matters. The Global Matter Search, which is found on the Global Toolbar, will search through all modules and matters to which you have at least read access according to the search criteria you specify.
Each module has a Search button that will search for all matters within that module to which you have at least read access according to the search criteria you specify.
You can find all your matters across all modules by selecting the My Open Files icon from the Global Toolbar. You can find all your matters within a specific module by selecting Show My Open Files on a Module Toolbar.
For detailed instructions on searching for a matter, check out the following article: Find a Matter
Attaching Files to Matters
Importing Files and Folders
Any type of allowable file or any folder containing allowable file types may be imported into a matter in CLW. Almost all file types are allowable. Applications, such as those that end with the file extension, .exe, are not allowed. All other documents, images, audio, or video file types can be imported successfully.
Folders can be imported using the Import Folder button on the Documents tab of the Attachments tab view (the paperclip). Files can be imported using the Import Files button on the Documents tab of the Attachments tab view (the paperclip).
For detailed instructions on importing a folder from your Desktop, check out the following article: Import a Folder from Desktop
Importing Using CyImportFile Tool
Any file on your Desktop can be dragged onto the CyImportFile icon to be directly imported into CLW. This is only available if the CyImportFile icon has been added to your Desktop.
For instructions to add the CyImportFile Tool to your Desktop, check out the following article: Add CyImportFile Icon to Desktop
Importing Using Send To Option
Any file on your computer can be imported into CLW by using the Send To option by right-clicking the file and selecting Send To and then selecting the CLW Import option. This is only available if CLW has been added to your Send To Menu.
For instructions to add CLW to your Send To options, check out the following article: Add CityLaw / CountyLaw to Send To Menu
Importing Using Outlook Add-In
Email can be imported to CLW if you have the Cycom Email Exporter Plus add-in for Outlook. If you do, you will see a CLW tab in the Menu Bar at the top of Outlook.
For instructions for importing an email and/or email attachment from Outlook to CLW, check out the following articles:
Creating New Documents from Templates
New documents can be created from templates. Each user has access to System and Personal templates that are stored on a shared drive.
To create a new document, from the Documents tab of the Attachments tab view, press New and then select the template. Templates are module specific, so you will likely need to first select the folder for the module and then select the template inside that module. Some exceptions exist, but such practice is discouraged.
Support Contact Information
Cycom Support can be reached in the following ways:
- Phone call to 888-292-6688
- Email to support@cycominc.com
Email is usually the quickest way to reach support. Many questions or issues can be addressed even when we are assisting other clients.
When contacting support, please include the following:
- Your name and site (City, Division (if applicable), and State)
- The question or issue
- Details relevant to the question or issue
- These might include the following:
- Module(s) involved
- Actions you have attempted and results
- Tab(s) involved
- Report(s) involved
- If an issue has occurred, these are helpful:
- When did it occur?
- Was this working correctly previously?
- Is it happening for one user or many?
- Are there error messages? (Screenshots or exact wording are very helpful)
Comments
0 comments
Please sign in to leave a comment.